Anomaly Detection in Power BI: Find Outliers with Built-In AI
In today’s data-driven world, organizations depend on fast and accurate insights to make smart decisions. One of the most valuable insights you can gain is detecting anomalies , data points that deviate significantly from the norm. These unexpected values often signal critical issues or rare opportunities: from spotting fraud in financial data to identifying operational disruptions or discovering untapped market trends.
The good news? You don’t need a PhD in data science to find these outliers. Microsoft Power BI now includes built-in anomaly detection, using AI to automatically surface insights right inside your visuals.
1. Example: Spotting Sales Anomalies in a Retail Chain
Recently, a stakeholder asked me:
“Can you investigate all outliers and tell me what caused them?”
My first reaction? There’s no way I can check every point manually! But then I enabled anomaly detection in Power BI and became a data wizard.
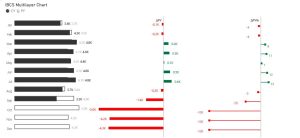
Take this case: one store in the northern region suddenly saw a major drop in daily sales. It wasn’t seasonal, nor tied to a promotion. I visualized the sales data on a line chart, enabled anomaly detection, and Power BI instantly flagged the drop and even suggested causes like low stock levels or store renovations. What would’ve taken hours, took minutes.
2. What is an Anomaly?
An anomaly is a data point that significantly deviates from the expected trend. In business, anomalies might appear as:
- A sharp decline in sales
- A spike in website traffic
- A surge in error rates
- A dip in manufacturing output
These outliers can signal problems or new opportunities. Catching them early is crucial.
3. What Is Anomaly Detection in Power BI?
Anomaly detection in Power BI is an AI-powered feature that flags unusual values in time series data directly within your line charts. Introduced in November 2020, it requires no coding or external models.
You can:
- Enable anomaly detection on line charts
- Automatically highlight outliers
- View AI-generated explanations to understand the anomaly’s cause
This makes complex analysis approachable for everyone.
4. Key Considerations When Using Anomaly Detection
To use anomaly detection effectively, keep in mind:
- Only works on line charts with time series data on the X-axis
- No support for legends, multiple or secondary values
- Needs at least four data points
- Does not work with Forecast, Average, Median, Min or Max, or Percentile lines
- Unsupported data sources include:
- SAP (DirectQuery)
- Power BI Report Server
- Live connections to Azure or SQL Server Analysis Services
- If you use “Show Value As,” explanations will not work
- Drill-down is not supported
5. How to Use Anomaly Detection in Power BI
Step-by-Step Guide:
- Create a Line Chart
- Example dataset:
Date,ProductID,TotalAmount
- Example dataset:
- Set Axes
- X-axis:
Date(must be a date column, not a hierarchy) - Y-axis:
TotalAmount
- X-axis:
- Enable the Feature
- Go to the Analytics pane (formerly named Format pane)
- Turn on Anomalies
- Adjust Sensitivity
- Higher = more anomalies
- Lower = fewer, more significant ones
- Explain by field
- In the “Explain by” field in Power BI’s Anomaly Detection, you can add one or more columns from your dataset that will act as factors to help explain why an anomaly occurred.
-
For example, if sales drop unexpectedly, adding “Region” as an Explain by factor might reveal that the decline was mainly driven by one specific region.
- Additional Customization options:
- Shape
-
Controls how detected anomalies appear in the chart.
-
Options: Circle, Square, Triangle, Diamond, etc.
-
- Shape
-
- Color
-
Lets you customize the color of anomalies (e.g., red for negative, green for positive).
-
- Border
-
Adds a border around anomaly markers for better visibility.
-
Adjust thickness and color to make anomalies stand out.
-
- Expected Range
-
Displays a shaded band around the expected trend, showing normal variation.
-
Anomalies appear outside this range, making deviations obvious.
-
- Color
7.Explore the Explanations
-
- Click a data point
- Power BI uses your model fields to find what changed (e.g., region, product, store)
Note: This feature requires a single date column on the X-axis. It does not work when using a date hierarchy.
Watch full tutorial here;
Limitations:
- Time-series only
- No multi-line detection
- Explanations may be limited by your dataset’s structure
6. Conclusion
Power BI’s anomaly detection makes it easy to spot unexpected trends in your data and explain them automatically. It transforms how users interact with data by turning complex statistical tasks into intuitive visual insights.
If you’re in analytics, reporting, or business strategy, you owe it to yourself to explore this feature. It will save time, uncover critical trends, and most importantly, help you impress your stakeholders with data-driven stories.