The RIGHT Way to Build Calendar Table
In Power BI, a calendar table isn’t just a nice to-have. It’s a foundation for any time-based analysis. Whether you’re tracking sales over time, comparing year-to-date performance, or building complex time intelligence, it all starts with a proper date table.
Many developers turn to DAX functions like CALENDARAUTO, but there’s a better way—one that gives you full control, improves performance, and results in a cleaner, more professional data model.
In this article, you’ll learn how to build the perfect calendar table using Power Query’s List.Dates function. Once you see how it works, you’ll understand why this should be your default approach moving forward.
Why This Is the Perfect Calendar Table
1. Full Access to Power Query Features
Tables built in Power Query support the entire suite of transformations: filtering, merging, grouping, sorting, column extraction, and more. These options are not available for DAX-created tables.
DAX tables are static model tables and cannot benefit from Power Query’s interactive tools. Once the table is created with DAX, any transformation must also be written in DAX—this is not ideal for data shaping tasks.
2. Add Key Calendar Columns with One Click
In Power Query, you can easily add important date components without writing any formulas:
-
Select your
Datecolumn -
Go to Add Column > Date
-
Choose from options like Year, Month, Quarter, Day, Day Name, Week of Year, etc.
It’s all on one click. No code. No custom logic. This makes the process faster and easier.
3. Lower Memory Usage
DAX tables are created in-memory, which means they consume RAM every time the model is refreshed. This can become a performance issue in large datasets or enterprise models.
Power Query tables are evaluated before being loaded into the model, reducing memory pressure and speeding up the overall refresh process. This distinction matters when scaling up your solution.
4. Separation of Logic and Data Prep
With a Power Query-based calendar table, you keep your data preparation process cleanly separated from your DAX measures. This results in a clearer and more maintainable model structure.
5. Full Customization at Any Level
Whether you’re working with fiscal calendars, custom week starts, or multiple languages, Power Query lets you build exactly what you need.
Step-by-Step: Building the Perfect Calendar Table
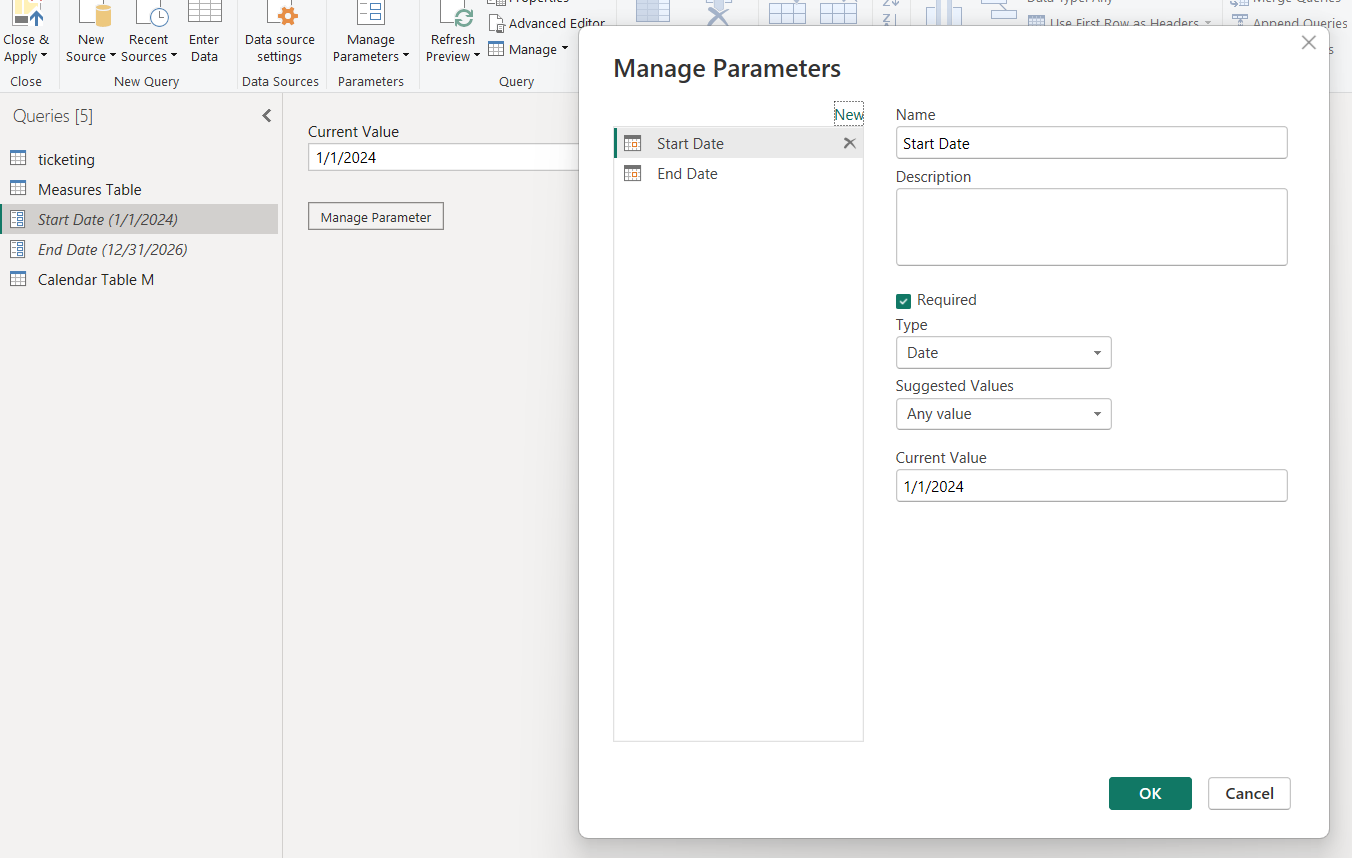
Step 1: Create Start and End Date Parameters
In Power Query:
-
Go to Manage Parameters > New Parameter
-
Create
StartDate(e.g.1/1/2024) -
Create
EndDate(e.g.12/31/2026)
Step 2: Use the List.Dates Function
To generate a list of sequential dates between your defined Start Date and End Date, we use the powerful M function List.Dates. This function allows us to create a list where each value represents a single day.
Function Syntax
Let’s break this down:
-
start: The first date in your list.
-
count: The total number of dates to generate.
-
step: The time interval between each date. This must be a duration (e.g., 1 day, 2 days, etc.).
Example:
List.Dates(#date(2024, 1, 1), 5, #duration(1, 0, 0, 0))
This will return:1/1/2024,1/2/2024,1/3/2024,1/4/2024,1/5/2024
The Formula We’re Using
This formula dynamically generates all dates from your start to your end date. Here’s how it works:
-
#"Start Date": The parameter you created, such as1/1/2024. -
#"End Date": Another parameter, like12/31/2026. -
Duration.Days(#"End Date" - #"Start Date") + 1: This calculates the number of days between the start and end dates. The+1ensures the end date is included in the list. -
#duration(1, 0, 0, 0): This defines a step of one day. The format is#duration(days, hours, minutes, seconds), and we’re stepping by 1 day at a time.
Without the
+1, the list would exclude the end date, which is a common mistake when building date tables manually.
The result is a continuous list of dates from your start to end values—perfect for a clean and complete calendar table.
Once this list is generated, you can convert it into a proper table by clicking “To Table” in the Power Query interface and then name the column something like Date.

Step 3: Add Date Attributes
Use the Power Query UI:
-
Select the
Datecolumn -
Click Add Column > Date
-
Add attributes like:
-
Year
-
Month
-
Quarter
-
Week of Year
-
Day Name
-
Month Name
-
All of this requires no additional code, a major productivity benefit.
For the end
The next time you need a calendar table, skip DAX and take advantage of what Power Query has to offer.
✅ Easy to build
✅ Lightweight on memory
✅ Professional structure
✅ Full access to transformations
✅ Instant date columns, no formulas needed
Whether you’re working on a simple report or an enterprise-grade data model, this approach gives you the perfect calendar table it is faster, cleaner, and more powerful.
Once you try it, you’ll never go back to CALENDARAUTO.
If you want to see the full tutorial on how to do this step by step, you can watch it on my YouTube channel: